

Join on WhatsApp
Get the latest updates directly on WhatsApp – motivation, news & more!
 Join On WhatsApp
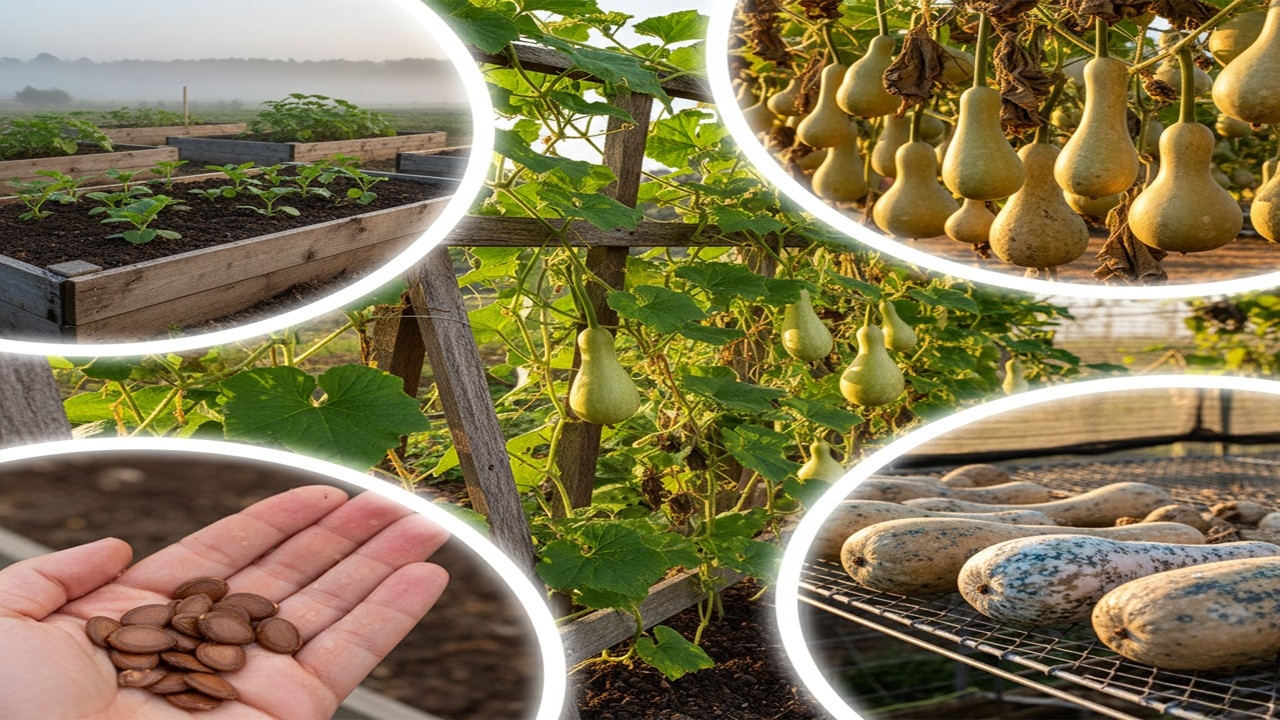
Club gourd, also known as caveman club gourd, is one of the most visually striking members of the gourd family. With its elongated neck and knobby, bulbous end resembling a primitive weapon, this gourd is both ornamental and functional. Traditionally used for crafts, containers, and musical instruments, the caveman club gourd also has culinary potential when harvested young. Native to tropical regions and historically cultivated across Asia, Africa, and the Americas, this gourd has found a place in modern gardens for its unique shape and high yield. Growing club gourd requires patience, space, and attention to detail, but the results are rewarding for gardeners and artists alike.
Understanding the Caveman Club Gourd
The caveman club gourd belongs to the Lagenaria genus, which includes hard-shelled gourds used for utilitarian and decorative purposes. This particular variety typically grows between 10 to 16 inches long, with a narrow neck and a bulbous, wrinkled end that can reach up to 6 inches in diameter. When harvested young-around 8 inches-it is edible and can be cooked like other tender gourds. As it matures, the shell hardens, making it ideal for drying and crafting. Its unique appearance and versatility make it a favorite among gourd enthusiasts and hobby farmers.
Climate and Soil Requirements
Club gourds thrive in warm climates and require a long growing season of at least 120 days. They are frost-sensitive and should only be planted after the last danger of frost has passed. Ideal growing zones range from USDA 3 to 10, with optimal soil temperatures between 70°F and 85°F. The soil should be well-drained, fertile, and rich in organic matter. A slightly acidic to neutral pH between 6.0 and 7.0 is preferred. Gourds are heavy feeders and benefit from soil enriched with compost or aged manure. Raised beds or mounded rows help improve drainage and root development.
Seed Selection and Germination
Start with healthy, mature seeds sourced from reputable suppliers or saved from previous harvests. To improve germination rates, soak the seeds overnight in warm water. In regions with shorter growing seasons, start seeds indoors in peat pots 3 to 4 weeks before the last frost. For direct sowing, wait until the soil has warmed to at least 70°F. Plant seeds 1 inch deep in hills or rows, spacing them 3 to 5 feet apart to allow for vigorous vine growth. Germination typically occurs within 7 to 14 days under warm, moist conditions.
Planting and Trellising
Club gourds are sprawling plants that require ample space to grow. Plant them at the edge of the garden or near a fence where vines can spread freely. Trellising is highly recommended to save space and improve fruit shape. Vertical growth prevents gourds from resting on the soil, reducing the risk of rot and deformation. Use sturdy supports such as wire cages, bamboo frames, or wooden trellises. As vines grow, gently train them upward and secure with soft ties. This method also improves air circulation and sun exposure, promoting healthier plants.
Watering and Fertilization
Consistent moisture is crucial during the early growth stages. Water deeply once or twice a week, depending on weather conditions, ensuring the soil remains evenly moist but not waterlogged. Drip irrigation or soaker hoses are ideal for minimizing leaf wetness and preventing fungal diseases. Increase watering frequency once fruits begin to form. Fertilize at planting with a balanced organic fertilizer, then continue monthly applications throughout the growing season. Gourds respond well to high nitrogen early on, followed by moderate potassium and phosphorus to support flowering and fruiting.
Flowering and Pollination
Club gourds produce both male and female flowers, with male flowers appearing first in clusters and female flowers developing singly. Pollination is primarily carried out by bees and other insects. To ensure fruit set, especially in low-pollinator areas, manual pollination may be necessary. Use a soft brush or cotton swab to transfer pollen from male to female flowers. Flowering typically begins 30 to 40 days after planting, and successful pollination leads to rapid fruit development. Monitor flowers daily during peak bloom to maximize yield.
Vine Management and Pruning
As vines grow aggressively, regular pruning helps maintain plant health and direct energy toward fruit production. Remove dead or damaged leaves to improve airflow and reduce disease risk. Pinch off secondary vines if space is limited, focusing growth on the main stem. Mulching around the base of the plant helps retain moisture, suppress weeds, and regulate soil temperature. Avoid overhead watering to minimize fungal issues, especially during cooler nights. Proper vine management ensures a cleaner growing environment and better-shaped gourds.
Container Growing Tips
While club gourds prefer open ground, they can be grown in large containers with proper care. Choose pots at least 24 inches in diameter with good drainage. Use a rich potting mix amended with compost and perlite for aeration. Place containers in full sun and provide vertical support for vines. Container-grown gourds require more frequent watering and feeding due to limited soil volume. Monitor closely for nutrient deficiencies and adjust fertilization accordingly. This method is ideal for small gardens or urban spaces where ground planting isn’t feasible.
Pest and Disease Control
Common pests include aphids, squash bugs, cucumber beetles, and vine borers. Inspect plants regularly and use organic insecticides or neem oil sprays as needed. Introduce beneficial insects like ladybugs and lacewings to control pest populations naturally. Fungal diseases such as powdery mildew and downy mildew can be prevented through proper spacing, pruning, and watering techniques. Avoid wetting foliage and water early in the day. Crop rotation and soil solarization help reduce disease buildup in the soil. Healthy plants are more resilient and produce better yields.
Harvesting Club Gourds
Harvesting depends on intended use. For culinary purposes, pick gourds when they are about 8 inches long and still tender. For crafting or drying, allow fruits to mature fully on the vine. Late in the season, stems and leaves will begin to wither and turn brown. Cut gourds from the vine, leaving about 2 inches of stem attached. Wash with a solution of white vinegar and water to deter mold. Place in a warm, dry location with good air circulation. Gourds typically take several weeks to dry completely, becoming lightweight with seeds rattling inside.
Drying and Curing Process
Proper drying is essential for crafting and seed saving. Place harvested gourds on a screen or mesh surface to allow airflow on all sides. Rotate periodically to prevent flat spots and mold buildup. Surface mold is normal and can be wiped away gently. If a gourd begins to rot or shrivel, discard it. Once fully dry, the shell will be hard and seeds will rattle inside. For seed extraction, cut open the gourd or drill a hole and shake out the seeds. Dry seeds thoroughly before storing in a cool, dry place. Properly cured gourds can last for years and be used in various artistic applications.
Uses of Caveman Club Gourds
Beyond their ornamental appeal, caveman club gourds have a rich history of practical use. Dried gourds are transformed into birdhouses, musical instruments, bowls, and decorative art. Their thick shells make them ideal for carving, painting, and pyrography. In some cultures, they are used as fishing floats or ceremonial objects. When harvested young, they can be cooked like squash or bottle gourd. Their unique shape also makes them popular in fall displays and garden exhibitions. Whether for utility or aesthetics, club gourds offer endless creative possibilities.
Seed Saving and Propagation
Saving seeds from mature gourds is straightforward. Once dried, extract seeds and spread them out to dry further. A fully dried seed will snap in half, while a bendable seed needs more time. Store seeds in airtight containers in a cool, dry place. They remain viable for up to six years. For propagation, stem cuttings can be used in warm climates. Select healthy 6 to 8 inch stems and root them in a mix of peat and perlite. Keep in a humid environment until roots form, usually within 2 to 4 weeks. This method allows gardeners to expand their gourd collection efficiently.
Lifecycle and Growth Timeline
Club gourds are annual plants, completing their lifecycle in one growing season. From seed to harvest, the process takes approximately 120 days. Germination occurs within two weeks, followed by rapid vine growth and flowering around day 40. Fruit development begins shortly after pollination and continues for several weeks. Maturation and drying take place in late summer to early fall. Understanding this timeline helps gardeners plan their planting schedule and anticipate harvest windows. With proper care, each plant can produce multiple gourds, making it a high-yield crop.
Cultural and Historical Significance
Gourds have been cultivated for thousands of years across continents. Archaeological evidence suggests early domestication in Asia, Africa, and the Americas. Caveman club gourds, with their primitive shape, evoke ancient tools and ceremonial items. They were used by indigenous peoples for storage, music, and rituals. Today, they continue to inspire artists and gardeners alike. Their resilience, adaptability, and aesthetic appeal make them a symbol of sustainable living and creative expression. Growing club gourds connects modern gardeners to a rich cultural heritage rooted in craftsmanship and nature.
Final Thoughts on Growing Club Gourd
Cultivating club gourd or caveman club gourd is a rewarding endeavor that combines horticulture with artistry. From seed selection to harvest, each stage offers opportunities to learn and create. With the right conditions-warm climate, fertile soil, and attentive care-these gourds flourish and produce stunning, functional fruits.