

Join on WhatsApp
Get the latest updates directly on WhatsApp – motivation, news & more!
 Join On WhatsApp
Garlic is one of the oldest cultivated crops in the world and has been valued not only as a flavorful ingredient but also for its medicinal properties. Growing garlic at home is surprisingly simple, and the rewards are plenty. A few cloves planted at the right time can produce a season’s worth of fresh bulbs, which are tastier and healthier than most store-bought garlic. This guide explains step by step how to plant, care for, and harvest garlic successfully.
Understanding Garlic Varieties
Before you begin, it is important to know the two main types of garlic: hardneck and softneck. Hardneck garlic produces a flowering stalk called a scape and is known for its strong flavor. It grows best in colder climates and produces fewer but larger cloves. Softneck garlic is commonly found in grocery stores and has a milder flavor. It produces more cloves per bulb, stores longer, and is better suited to warmer regions. Choosing the right type for your climate will ensure better results in your garden.
Preparing the Soil
Garlic thrives in loose, well-draining soil that is rich in organic matter. Heavy clay soils can hinder bulb development, so amend the soil with compost, sand, or well-rotted manure to improve texture and fertility. Garlic prefers slightly acidic to neutral soil with a pH between 6.0 and 7.0. Before planting, loosen the soil to a depth of at least 8 inches and remove any weeds or stones. Healthy soil is the foundation for strong roots and large bulbs.
Choosing and Preparing Seed Garlic
Unlike many vegetables, garlic is not grown from seeds but from cloves. Purchase certified seed garlic from a trusted source rather than using supermarket garlic, which may be treated to prevent sprouting or carry diseases. Break apart the bulb carefully into individual cloves, keeping the papery skin intact. Select the largest, healthiest cloves for planting, as they are more likely to produce large bulbs. Smaller cloves can be used in the kitchen instead of being planted.
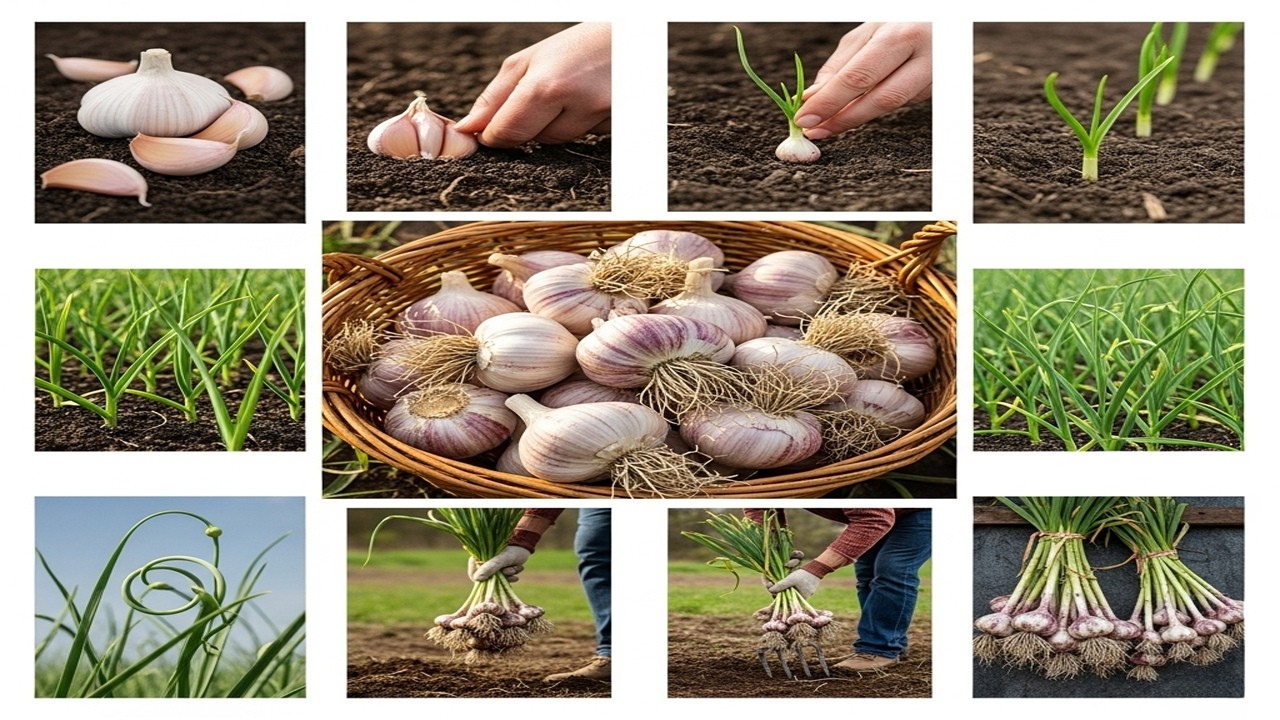
Planting Garlic Cloves
Garlic is usually planted in the fall, a few weeks before the ground freezes. This allows the cloves to establish roots before winter. In warmer regions, it can also be planted in late winter or early spring. To plant, make rows about 12 inches apart and place cloves 4 to 6 inches apart within each row. Insert each clove into the soil with the pointed end facing upward and the flat basal plate downward, about 2 inches deep. Cover the cloves with soil and water gently.
Mulching for Protection
Mulching is an important step when growing garlic, especially in regions with cold winters. Cover the planted area with a thick layer of straw, leaves, or grass clippings. Mulch helps insulate the soil, prevents weeds from competing with the garlic, and conserves moisture. In spring, the mulch can be pulled back slightly to allow the soil to warm faster, encouraging strong growth. Mulching also protects the cloves from temperature fluctuations during winter.
Watering Garlic Correctly
Garlic requires consistent moisture during its growing season, but it does not tolerate waterlogged soil. Water the plants deeply once or twice a week, depending on rainfall, so that moisture reaches the root zone. As the bulbs start to mature in late spring or early summer, reduce watering to prevent rot and encourage the bulbs to dry properly. Overwatering is one of the most common mistakes gardeners make with garlic, so be mindful of soil conditions.
Fertilizing Garlic for Best Growth
Garlic is a heavy feeder and benefits from additional nutrients during the growing season. At planting time, mix compost or a balanced organic fertilizer into the soil. In spring, once the shoots are a few inches tall, apply a nitrogen-rich fertilizer such as blood meal or fish emulsion to promote leafy growth. Repeat the application every three to four weeks until the bulbs begin to swell. Avoid excessive nitrogen later in the season, as it can delay bulb development.
Caring for Garlic Scapes
If you are growing hardneck garlic, the plants will produce flower stalks called scapes in late spring. While attractive, scapes draw energy away from the bulb. Cutting them off encourages larger bulb growth. The good news is that garlic scapes are edible and have a mild garlic flavor, making them perfect for stir-fries, pestos, or grilling. Harvesting scapes not only improves bulb size but also provides an early bonus crop.
Managing Weeds and Pests
Garlic does not compete well with weeds, so regular weeding is essential. Mulch helps suppress weeds, but you may still need to hand-pull intruders. Pests are usually not a major problem for garlic, but onion thrips, nematodes, and fungal diseases can occasionally appear. Crop rotation is the best defense against soil-borne diseases, so avoid planting garlic or onions in the same spot each year. Healthy soil and good spacing will minimize most problems.
When and How to Harvest Garlic
Garlic is typically ready to harvest in mid to late summer, depending on when it was planted and the climate. The best indicator is the leaves. When the lower leaves begin to turn yellow and dry while the upper leaves remain green, the bulbs are ready. Use a garden fork to gently loosen the soil and lift the bulbs out. Avoid pulling them by hand, as this can damage the stems or bulbs. Harvesting at the right time ensures that the cloves are fully developed and flavorful.
Curing and Storing Garlic
Freshly harvested garlic needs to be cured before long-term storage. Brush off excess soil without washing, then bundle the plants or lay them in a single layer in a dry, well-ventilated place away from direct sunlight. Allow them to cure for two to three weeks until the skins are papery and the necks are dry. Once cured, trim the roots and cut the stems if you do not plan to braid them. Store garlic in a cool, dark, and dry location with good airflow. Softneck garlic varieties can last for up to eight months, while hardneck types generally store for three to five months.
Using Fresh Garlic
Homegrown garlic has a richer flavor than most store-bought varieties. Use it fresh in cooking, roast whole bulbs for a sweet flavor, or pickle cloves for long-term enjoyment. Garlic can also be preserved in oil, though this requires careful handling to avoid spoilage. Dried garlic flakes and garlic powder are other ways to extend your harvest. Having a steady supply of homegrown garlic in the kitchen adds depth to countless recipes.
Common Mistakes to Avoid
Several mistakes can affect your garlic crop. Planting too late in the season may not give cloves enough time to develop roots. Using cloves from grocery store garlic often leads to poor growth or disease problems. Overwatering, especially close to harvest, can cause bulbs to rot. Harvesting too early results in small bulbs, while leaving them in the ground too long can cause them to split. By paying attention to these details, you can avoid frustration and grow a healthy crop.
Final Thoughts
Growing garlic at home is a simple but rewarding gardening project. With minimal space and care, you can enjoy flavorful bulbs that store well and enhance your cooking for months. By choosing the right variety, preparing the soil, and following the proper planting and care techniques, you set yourself up for success. From the excitement of planting cloves in autumn to the satisfaction of harvesting full bulbs in summer, garlic is a crop that every home gardener should try at least once.