

Join on WhatsApp
Get the latest updates directly on WhatsApp – motivation, news & more!
 Join On WhatsApp
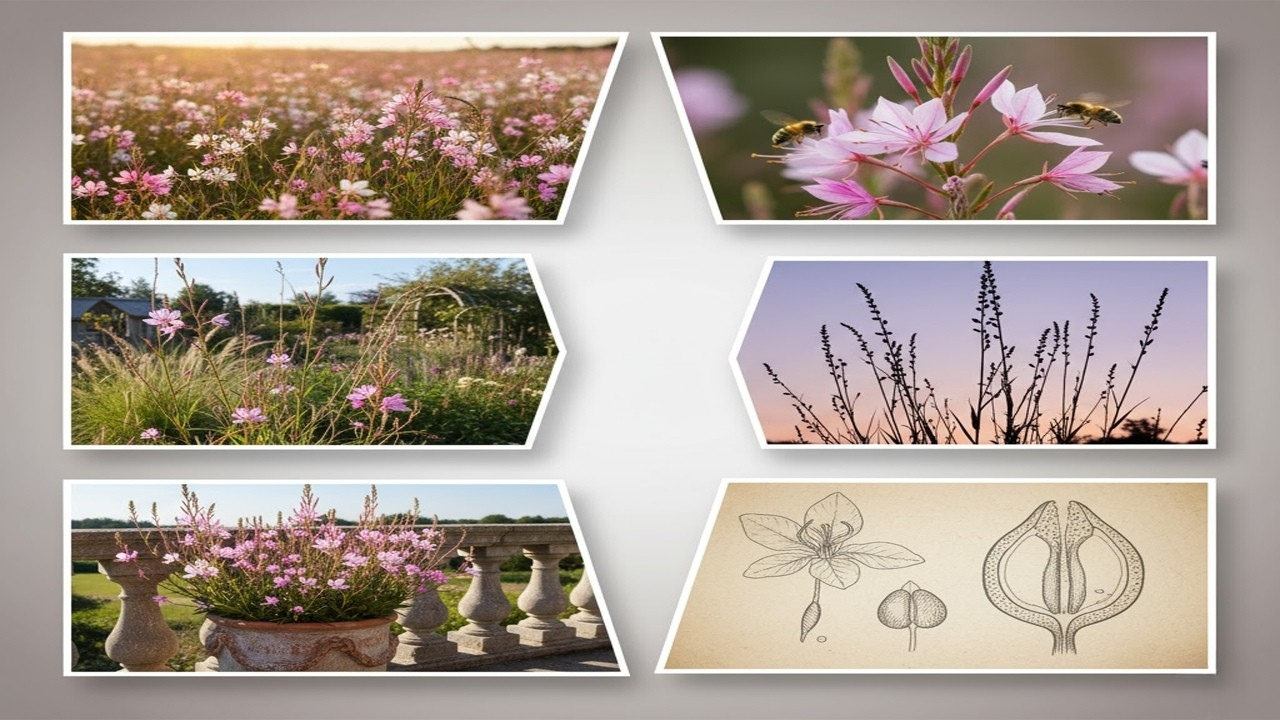
Gauras, often called “Whirling Butterflies,” are graceful, long-blooming perennials that bring movement, texture, and a touch of wild elegance to any garden. Their delicate flowers flutter in the breeze like butterflies, making them a favorite among gardeners who value both beauty and resilience. Native to North America, particularly Texas and Louisiana, gauras have adapted well to a variety of climates and soil types, thriving in conditions that might challenge more temperamental plants. This guide offers a comprehensive look at how to grow gauras successfully, from choosing the right variety to planting, care, and seasonal maintenance.
Understanding Gauras and Their Appeal
Gauras belong to the genus Oenothera, with the most popular species being Oenothera lindheimeri, formerly known as Gaura lindheimeri. These plants are known for their airy stems, lance-shaped leaves, and four-petaled flowers that range in color from white to pink. The blooms open sequentially along tall, wand-like stems, creating a continuous display from late spring through autumn. Their informal, meadow-like appearance makes them ideal for cottage gardens, wildflower borders, and pollinator-friendly landscapes.
One of the most appealing aspects of gauras is their ability to attract bees, butterflies, and other beneficial insects. Their nectar-rich flowers provide a valuable food source throughout the growing season, making them a key player in ecological gardening. Additionally, gauras are drought-tolerant, deer-resistant, and relatively low-maintenance, making them suitable for both novice and experienced gardeners.
Choosing the Right Gaura Variety
While Oenothera lindheimeri is the most commonly grown species, there are several cultivars that offer variations in size, color, and growth habit. ‘Whirling Butterflies’ is a classic white-flowered variety known for its tall, graceful stems and prolific blooming. ‘Siskiyou Pink’ features rosy-pink flowers and a slightly more compact form, ideal for smaller gardens. ‘Sparkle White’ is a newer cultivar with pure white blooms and improved disease resistance. Dwarf varieties like ‘Gaudi Pink’ and ‘Belleza Compact White’ are perfect for containers or tight spaces, offering the same charm in a more manageable size.
When selecting a variety, consider your garden’s color palette, available space, and sunlight exposure. Most gauras prefer full sun but can tolerate light shade, especially in hotter climates. Their informal growth habit pairs well with ornamental grasses, salvias, and coneflowers, creating a dynamic and naturalistic planting scheme.
Climate and Growing Conditions
Gauras thrive in warm, temperate climates and are well-suited to USDA zones 5 through 9. In India, they perform best in regions with mild winters and hot summers, such as Madhya Pradesh, Maharashtra, and parts of Karnataka. They prefer full sun and well-drained soil, making them ideal for xeriscaping and low-water gardens. While they can tolerate some humidity, excessive moisture or poor drainage can lead to root rot and fungal issues.
In cooler regions, gauras may die back in winter but often return in spring if protected from frost. Mulching with straw or dry leaves can help insulate the roots during cold spells. In warmer zones, they may remain evergreen or semi-evergreen, providing year-round interest.
Soil Preparation and pH Requirements
Gauras are not fussy about soil but perform best in sandy or loamy soil with good drainage. Heavy clay or compacted soil can hinder root development and increase the risk of disease. Before planting, loosen the soil to a depth of 12 to 15 inches and incorporate organic matter such as compost or well-rotted manure. This improves soil structure and fertility, giving young plants a strong start.
The ideal soil pH for gauras ranges from 6.0 to 7.0. If your soil is too acidic or alkaline, amend it accordingly with lime or sulfur. A simple soil test can help determine pH and nutrient levels, allowing for targeted adjustments. Avoid over-fertilizing, as this can lead to excessive foliage growth at the expense of flowers.
Planting Gauras in the Garden
Gauras can be planted from seeds, cuttings, or nursery-grown transplants. Seeds should be sown in early spring after the last frost or in autumn in warmer climates. Sow them directly into the garden or start them indoors in seed trays. Germination typically takes two to three weeks, and seedlings should be thinned to 12 to 18 inches apart once they develop true leaves.
Transplants and cuttings can be planted in spring or early autumn. Dig a hole twice the width of the root ball and place the plant at the same depth it was growing in its container. Backfill with soil and water thoroughly to settle the roots. Space plants 18 to 24 inches apart to allow for their airy growth habit and prevent overcrowding.
Watering and Moisture Management
While gauras are drought-tolerant once established, they require regular watering during their first growing season. Water deeply once or twice a week, depending on weather conditions, to encourage deep root growth. Avoid shallow, frequent watering, which can lead to weak plants and increased susceptibility to disease.
Once mature, gauras can survive on minimal water, making them ideal for water-wise gardens. However, during prolonged dry spells or extreme heat, supplemental watering may be necessary to maintain blooming. Mulching around the base of the plants helps retain moisture, suppress weeds, and regulate soil temperature.
Fertilization and Nutrient Needs
Gauras are light feeders and generally do well with minimal fertilization. Overfeeding can result in lush foliage with fewer flowers, so it’s best to use a balanced, slow-release fertilizer in spring. A 10-10-10 or 5-10-5 formula works well, providing essential nutrients without overstimulating growth.
Organic options such as compost tea, fish emulsion, or seaweed extract can also be used to boost plant health naturally. Apply fertilizer once in early spring and again in midsummer if needed. Avoid fertilizing in late autumn, as this can encourage new growth that may be damaged by cold weather.
Pruning and Deadheading
Regular pruning and deadheading help maintain the shape and vigor of gauras. Remove spent flowers to encourage continuous blooming and prevent self-seeding. In midsummer, plants may become leggy or floppy; cutting them back by one-third can rejuvenate growth and promote a fresh flush of blooms.
At the end of the growing season, trim back the stems to a few inches above the ground. In colder climates, wait until spring to prune, as the dead stems can provide some protection against frost. Always use clean, sharp tools to prevent the spread of disease and ensure clean cuts.
Pest and Disease Management
Gauras are relatively pest-free but can occasionally be affected by aphids, spider mites, or whiteflies. These pests can be controlled with neem oil, insecticidal soap, or a strong blast of water. Regular inspection and early intervention are key to preventing infestations.
Fungal diseases such as powdery mildew or root rot may occur in humid or poorly drained conditions. Ensure good air circulation by spacing plants appropriately and avoid overhead watering. If necessary, apply a fungicide or remove affected foliage to contain the spread.
Growing Gauras in Containers
Gauras adapt well to container gardening, especially dwarf varieties. Choose a pot at least 12 inches deep with good drainage holes. Use a lightweight, well-draining potting mix enriched with compost. Place the container in a sunny location and water regularly, allowing the soil to dry slightly between waterings.
Container-grown gauras may require more frequent feeding, as nutrients leach out with watering. Use a liquid fertilizer every four to six weeks during the growing season. Prune as needed to maintain shape and encourage blooming. In winter, move containers to a sheltered spot or insulate them with bubble wrap or straw to protect the roots.
Companion Planting and Design Ideas
Gauras blend beautifully with a wide range of garden companions. Their wispy stems and fluttering flowers contrast well with bold, upright plants like salvia, echinacea, and rudbeckia. They also pair nicely with ornamental grasses, adding movement and texture to mixed borders.
In cottage gardens, gauras can be interplanted with lavender, catmint, and coreopsis for a romantic, pastel palette. For a more modern look, combine them with succulents, agaves, and gravel mulch in a minimalist design. Their long blooming season makes them ideal for pollinator gardens, attracting bees, butterflies, and hummingbirds throughout the summer.
Seasonal Care and Maintenance
Gauras require minimal seasonal care but benefit from a few key practices. In spring, apply a layer of compost and mulch to refresh the soil and suppress weeds. Monitor for pests and diseases as new growth emerges. During summer, deadhead regularly and water during dry spells to maintain blooming.
In autumn, reduce watering and allow the plants to begin dormancy. Cut back stems after the first frost or leave them standing for winter interest. In regions with harsh winters, apply a thick layer of mulch to protect the roots. In spring, remove mulch and prune back any dead growth to encourage new shoots.
Common Mistakes to Avoid
One common mistake is planting gauras in heavy, poorly drained soil, which can lead to root rot and poor performance. Another is overwatering, especially in humid climates, which encourages fungal diseases. Over-fertilizing can result in excessive foliage and reduced flowering, while neglecting pruning may lead to leggy, untidy plants.