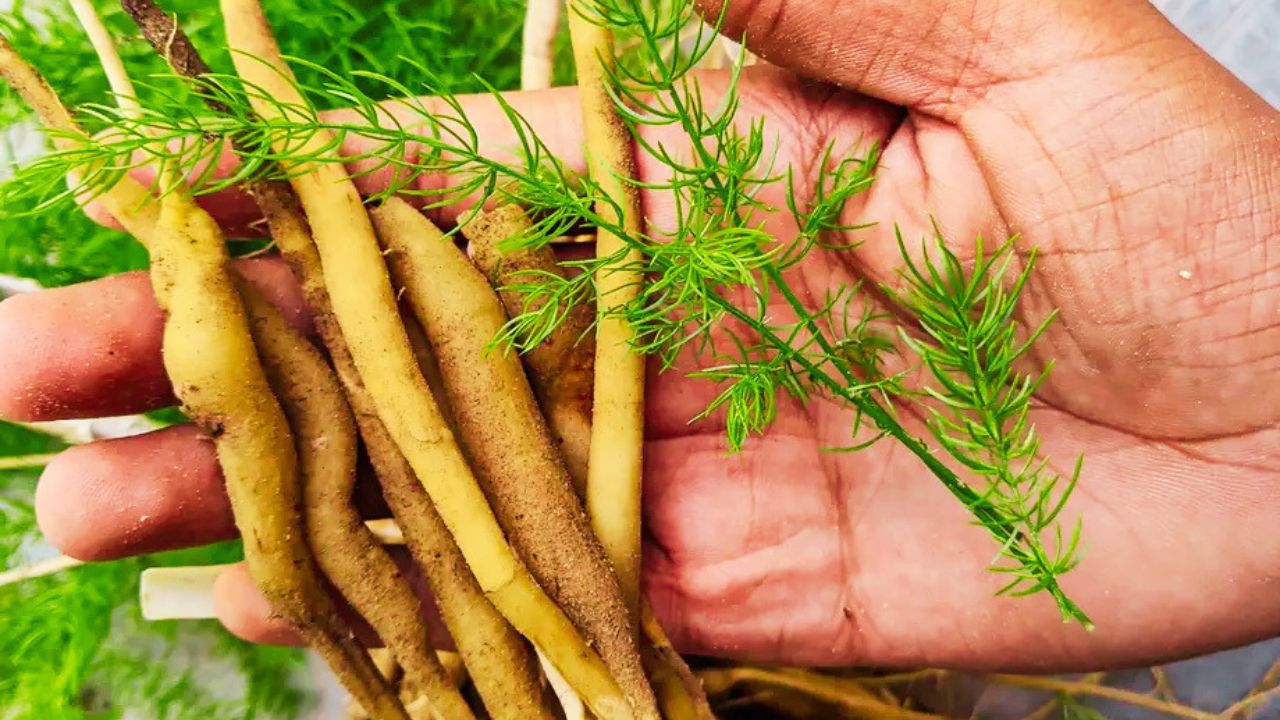
Shatavari (Asparagus racemosus) is a long-lived medicinal plant known for its slender climbing stems, delicate foliage, and fleshy tuberous roots. It is naturally suited to warm climates and can be grown successfully at home when provided with suitable soil, adequate sunlight, good drainage, and consistent care. Although shatavari develops slowly compared with many common garden plants, it can remain productive for several years once established.
The most important consideration when growing shatavari is creating conditions that resemble its natural environment. The plant prefers warmth, moderate moisture, and loose soil that allows its roots to expand freely. With proper preparation and patience, it can be cultivated in a garden bed, large container, or raised growing area.
Choosing the Right Location for Shatavari
Select a warm location that receives plenty of sunlight while offering some protection from harsh afternoon conditions. Shatavari generally performs well with around five to seven hours of sunlight each day. Good morning and filtered afternoon sunlight can encourage healthy growth without exposing young plants to excessive heat.
The growing area should also have good air circulation. Avoid planting shatavari in a spot where water regularly collects after rainfall or irrigation. Poor drainage can damage the roots and encourage fungal problems. A slightly elevated garden bed or raised container is often useful in areas with heavy or poorly draining soil.
Preparing the Best Soil for Shatavari
Shatavari grows best in loose, fertile, well-draining soil with plenty of organic matter. A sandy loam or loamy soil is generally suitable because it allows both drainage and root development. Heavy clay should be improved before planting because compacted soil can restrict the development of the plant’s underground roots.
Mixing mature compost or well-decomposed organic manure into the soil can improve fertility and structure. The soil should remain crumbly rather than hard or compacted. If you are growing shatavari in a container, use a mixture that drains easily instead of ordinary garden soil alone.
A container should have several drainage holes at the bottom. Since shatavari develops an extensive root system, choose a large and reasonably deep container from the beginning. A container that is too small can limit root development and make long-term cultivation difficult.
Selecting Seeds or Healthy Planting Material
Shatavari can be propagated from seeds, but growing it from seed requires patience because germination and early growth can be slow. Always select mature, healthy seeds from a reliable source. Seeds that are old, damaged, or poorly stored may have reduced germination.
The plant can also be propagated using established root material or other suitable vegetative planting methods. When using root divisions, choose healthy material without signs of rot, severe damage, or disease.
For beginners, seed propagation can be a rewarding option because it allows the complete development of the plant from an early stage. However, vegetative propagation may establish plants more quickly when healthy planting material is available.
Preparing Shatavari Seeds Before Planting
Before sowing, gently clean the seeds and remove any unwanted material. Some growers soak seeds in clean water for several hours before planting to help soften the outer covering and encourage more even germination.
Prepare a light, moist growing medium in a seed tray or small nursery container. Sow the seeds shallowly and cover them with only a thin layer of growing medium. Avoid burying them too deeply because excessive soil over the seed can interfere with emergence.
Keep the medium consistently moist but never waterlogged. Place the container in a warm location with good indirect or gentle sunlight. Germination may take time, so avoid disturbing the soil frequently while waiting for seedlings to appear.
Planting Shatavari Seedlings
Once seedlings have developed several healthy leaves and are strong enough to handle, they can gradually be moved into their permanent growing location. Transplant carefully because young roots can be delicate.
Prepare a planting hole large enough to accommodate the root system without bending or crushing it. Place the seedling at approximately the same depth at which it was growing in the nursery container. Gently fill the hole with soil and water lightly to settle the roots.
If planting multiple shatavari plants, provide enough space between them for root expansion and airflow. Crowded plants may compete for nutrients and moisture and can become more difficult to maintain as they mature.
Watering Shatavari Correctly
Shatavari prefers regular moisture during active growth but does not tolerate constantly saturated soil. Water the plant when the upper layer of soil begins to dry rather than following a rigid daily schedule.
Young plants may require more frequent watering because their root systems are still developing. Mature plants with established roots can generally tolerate short periods of dryness better than newly planted seedlings.
During periods of hot weather, check container-grown plants more frequently because containers can dry out faster than garden soil. During rainy weather, reduce additional watering and make sure excess water can drain away freely.
Overwatering is one of the most common problems in root crops and medicinal plants. Yellowing foliage, consistently wet soil, unpleasant soil odors, and declining growth can indicate that the roots are receiving too much moisture.
Providing the Right Amount of Sunlight
Adequate sunlight helps shatavari produce vigorous stems and foliage. A location receiving several hours of sunlight each day is generally ideal. Young plants may benefit from protection during periods of extremely intense heat, particularly when they are grown in small containers.
As the plant develops, its stems can become long and climbing. Providing a simple support structure can help keep the growth organized and prevent stems from spreading across the ground. A trellis, stake, or similar support can make maintenance easier while improving airflow around the foliage.
Feeding Shatavari for Healthy Growth
Shatavari benefits from fertile soil, especially during its active growing period. Incorporating compost before planting provides a good foundation for growth. Additional organic matter can be applied around the plant as a light top dressing when necessary.
Avoid excessive fertilizer. Too much nitrogen may encourage rapid leafy growth without providing the balanced conditions needed for healthy root development. A mild, balanced fertilizer used according to its instructions can be applied during active growth if the soil is lacking nutrients.
Container-grown plants may need nutrients more frequently than plants growing directly in the ground because repeated watering can gradually wash nutrients from the growing medium. However, feeding should remain moderate rather than excessive.
Managing Weeds Around Shatavari
Keep the area around shatavari relatively free of weeds, especially while plants are young. Weeds compete for water, nutrients, sunlight, and growing space, which can slow establishment.
Hand-weeding is often the safest approach around young plants because digging deeply can disturb developing roots. A thin layer of organic mulch can also help suppress weeds while reducing moisture loss from the soil.
Keep mulch slightly away from the main stem to prevent excessive moisture from remaining directly around the plant’s base. Proper mulching can be particularly helpful during hot and dry periods.
Supporting Mature Shatavari Plants
As shatavari grows, its stems may become slender and sprawling. A support structure allows the plant to grow upward and keeps the garden more organized. A trellis or sturdy stake can be installed before the plant becomes heavily established.
Tie stems loosely when necessary so they have room to expand. Avoid tightly binding the plant because this can damage delicate stems. Good support also makes it easier to inspect the plant for pests, remove weeds, and carry out routine maintenance.
Protecting Shatavari From Pests and Diseases
Healthy shatavari plants are generally easier to maintain when they receive suitable sunlight, proper nutrition, and good drainage. Nevertheless, pests such as aphids, mites, and other small insects may occasionally affect the foliage.
Inspect the stems and leaves regularly for unusual spots, discoloration, curling, sticky residue, or visible insects. Early detection makes problems much easier to manage.
Excessive moisture and poor airflow can increase the risk of fungal problems. Water near the base of the plant rather than repeatedly wetting the foliage, and avoid overcrowding. Remove severely damaged plant material when necessary and keep the growing area clean.
Seasonal Care for Shatavari
Shatavari generally grows best during warm conditions. During the active growing season, focus on consistent moisture, weed control, sunlight, nutrition, and support for climbing stems.
In cooler periods, growth may slow naturally. Avoid excessive watering when the plant is not actively growing, especially if temperatures are low and the soil dries slowly. Container plants should be protected from prolonged exposure to unusually cold conditions.
In hot weather, maintaining soil moisture becomes more important, but drainage should still remain excellent. Mulching can help stabilize soil moisture and temperature around the roots.
When and How to Harvest Shatavari Roots
One of the most important parts of growing shatavari is allowing the plant enough time to develop its characteristic underground roots. Harvesting too early can result in smaller roots and reduce the overall value of the crop.
Depending on growing conditions and the propagation method used, plants are typically allowed to mature for an extended period before harvesting. A mature plant will have a well-developed underground root system and established above-ground growth.
When harvesting, loosen the soil carefully around the plant rather than pulling the stems forcefully. Dig around the root zone with a suitable garden tool and gradually expose the roots. Work slowly to minimize breakage and damage.
After harvesting, gently remove excess soil and clean the roots. If the roots are intended for traditional or culinary use, make sure they are properly identified and handled. Medicinal plants should not automatically be assumed to be safe for everyone, particularly when used internally.
Caring for Shatavari After Harvest
If you want to continue cultivating shatavari, avoid harvesting every plant at the same time. Keeping some established plants can provide future planting material and help maintain a continuous growing cycle.
Healthy plants that remain in the garden can continue developing under suitable conditions. Continue providing moderate water, sunlight, and soil care according to the season.
If harvested roots are being preserved, they should be cleaned properly and dried under suitable conditions. Store dried material in a clean, dry place protected from moisture and contamination.
Common Mistakes to Avoid When Growing Shatavari
Several common mistakes can prevent shatavari from reaching its full potential. Overwatering is one of the biggest problems because constantly wet soil can damage the roots. Planting in compacted soil is another frequent mistake because shatavari needs room for underground root development.
Insufficient sunlight can result in weak, slow growth, while excessive fertilizer may produce abundant foliage without supporting balanced plant development. Crowding plants too closely can also reduce airflow and make maintenance more difficult.
Perhaps the most important mistake is harvesting prematurely. Shatavari is a patient crop, and allowing the plant enough time to establish a strong root system is essential for a worthwhile harvest.
Final Tips for Successfully Growing Shatavari at Home
Growing shatavari at home is a long-term gardening project that rewards patience and consistent care. Start with healthy seeds or planting material, prepare loose and fertile soil, provide several hours of sunlight, and maintain moderate moisture without allowing the soil to remain waterlogged.
Regular observation is more valuable than excessive intervention. Check the soil before watering, inspect foliage for pests, control weeds early, and provide support as the plant develops. With good drainage, suitable warmth, adequate sunlight, and enough time for the roots to mature, shatavari can become a productive and attractive addition to a home garden.
The key is to focus on healthy root development rather than rapid growth. By creating favorable conditions and allowing the plant to mature naturally, home gardeners can enjoy the experience of cultivating this distinctive perennial from planting through harvest.
